Monday, October 13, 2008

JavaScript XMLHttpRequest Wrapper

Here is my version of the XMLHttpRequest Wrapper, Open Source, and available on Google Code. Enjoy.

Here is a simple example of a http request with the lib:

new fiji.xhr('get', 'echo.php?param=value', function(xhr) {
   if (this.readyState == 4 && this.status == 200) {
      alert(this.responseText);
   }
}).send();

The readystate callback handler executes in the scope of the XHR Instance. So you can use the this keyword to reference the XHR object instance. This behavior is the same as the specifications for the callback scope in the W3C XMLHttpRequest Specs. You can also receive a reference to the XHR library instance which is passed as the first parameter to the callback. In the case above it would be xhr. This allows you to attach further references or objects to the XHR library instance that would be persisted for the duration of the XHR call. For example, a request ID.

Tuesday, August 26, 2008

Quoting Strings in SQLite with PHP

Unlike MySQL, SQLite follows the quoting standards in SQL strictly and does not understand the backslash \ as an escape character. SQLite only understands escaping a single quote with another single quote.

For example, if you receive the input data 'cheeky ' string' and use the PHP function addslahes() to escape literal characters in the string then you will get 'cheeky \' string' which according to SQLite is not escaped properly. You need to escape the string so that it looks like 'cheeky '' string'.

If you have magic_quotes turned on then you are in even more trouble. This PHP setting escapes all HTTP variables received by PHP with an equivalent of addslshes(). So the correct way to escape strings in SQLite would be:

function sqlite_quote_string($str) {
 if (get_magic_quotes_gpc()) {
  $str = stripslashes($str);
 }
 return sqlite_escape_string($str);
}
This will remove the escape characters added by the magic_quotes setting, and escape strings with SQLites sqlite_escape_string() function which correctly escapes the string with '.

Creating a custom SQLite Function in PHP

SQLite is available in PHP5 either by compiling PHP5 with SQLite support or enabling the SQLite extension dynamically from the PHP configuration (PHP.ini). A distinct feature of SQLite is that it is an embedded database, and thus offers some features a Server/Hosted database such as the popular MySQL database doesn't.

Creating Custom Functions in SQLite

One of the really cool features of SQLite in PHP is that you can create custom PHP functions, that will be called by SQLite in your queries. Thus you can extend the SQLite functions using PHP.

A custom Regexp function for SQLite in PHP

// create a regex match function for sqlite
sqlite_create_function($db, 'REGEX_MATCH', 'sqlite_regex_match', 2);
function sqlite_regex_match($str, $regex) {
 if (preg_match($regex, $str, $matches)) {
  return $matches[0];
 }
 return false;
}
The above PHP code will create a custom function called REGEX_MATCH for the SQLite connection referenced by $db. The REGEX_MATCH SQLite function is implemented by the sqlite_regex_match user function we define in PHP.

Here is an example query that makes use of the custom function we created. Notice that in the SQLite query, we call our custom function REGEX_MATCH:

$query = 'SELECT REGEX_MATCH(link, \'|http://[^/]+/|i\') AS domain, link, COUNT(link) AS total'
 .' FROM links WHERE domain != 0'
 .' GROUP BY domain'
 .' LIMIT 10';
$result = sqlite_query($db, $query);
This will make SQLite call the PHP function sqlite_regex_match for each database table row that is goes over when performing the select query, sending it the link field value as the first parameter, and the regular expression string as the second parameter. PHP will then process the function and return its results to SQLite, which continues to the next table row.

Custom Functions in SQLite compared to MySQL

In comparison with MySQL, you cannot create a custom function in PHP that mysql will use. MySQL allows creation of custom functions, but they have to be written in MySQL. Thus you cannot extend MySQL's query functionality with PHP.

I believe the reason for this is simply because having a callback function called on the client, by the database, over a Client-Server model for each row that has to be processed would be just inefficient. Imaging processing 100,000 rows in a MySQL database and having MySQL make a callback to PHP over a TCP connection, the overhead of sending the data back and forth for the callback would be way too much.
With an embedded database like SQLite, this isn't the case since making the actual communication between the language and the embedded database does not pose such a high overhead.

Monday, August 25, 2008

PHP Email Address validation through SMTP

Here is a PHP class written for PHP4 and PHP5 that will validate email addresses by querying the SMTP (Simple Mail Transfer Protocol) server. This is meant to complement validation of the syntax of the email address, which should be used before validating the email via SMTP, which is more resource and time consuming.

Update: Sept 8, 2008

The class has been updated to work with Windows MTA's such as Hotmail and many other fixes have been made. See changes. The class will no longer get you blacklisted by Hotmail due to improper HELO procedure.

Update: Sept 10, 2008

Window Support Added through Net_DNS (pear DNS class). Added support for validating multiple emails on the same domain through a single Socket. Improved the Email Parsing to support literal @ signs.

Update: Sept 29, 2008

The code for this project has been moved to Google Code. The latest source can be grabbed from SVN.

Update: Nov 22, 2008

SMTP Email Validation Class has been added to the Yii PHP Framework. http://www.yiiframework.com/. Yii is a high-performance component-based PHP framework for developing large-scale Web applications.

<?php
 
 /**
 * Validate Email Addresses Via SMTP
 * This queries the SMTP server to see if the email address is accepted.
 * @copyright http://creativecommons.org/licenses/by/2.0/ - Please keep this comment intact
 * @author gabe@fijiwebdesign.com
 * @contributers adnan@barakatdesigns.net
 * @version 0.1a
 */
class SMTP_validateEmail {

 /**
  * PHP Socket resource to remote MTA
  * @var resource $sock 
  */
 var $sock;

 /**
  * Current User being validated
  */
 var $user;
 /**
  * Current domain where user is being validated
  */
 var $domain;
 /**
  * List of domains to validate users on
  */
 var $domains;
 /**
  * SMTP Port
  */
 var $port = 25;
 /**
  * Maximum Connection Time to an MTA 
  */
 var $max_conn_time = 30;
 /**
  * Maximum time to read from socket
  */
 var $max_read_time = 5;
 
 /**
  * username of sender
  */
 var $from_user = 'user';
 /**
  * Host Name of sender
  */
 var $from_domain = 'localhost';
 
 /**
  * Nameservers to use when make DNS query for MX entries
  * @var Array $nameservers 
  */
 var $nameservers = array(
 '192.168.0.1'
);
 
 var $debug = false;

 /**
  * Initializes the Class
  * @return SMTP_validateEmail Instance
  * @param $email Array[optional] List of Emails to Validate
  * @param $sender String[optional] Email of validator
  */
 function SMTP_validateEmail($emails = false, $sender = false) {
  if ($emails) {
   $this->setEmails($emails);
  }
  if ($sender) {
   $this->setSenderEmail($sender);
  }
 }
 
 function _parseEmail($email) {
  $parts = explode('@', $email);
 $domain = array_pop($parts);
 $user= implode('@', $parts);
 return array($user, $domain);
 }
 
 /**
  * Set the Emails to validate
  * @param $emails Array List of Emails
  */
 function setEmails($emails) {
  foreach($emails as $email) {
  list($user, $domain) = $this->_parseEmail($email);
  if (!isset($this->domains[$domain])) {
    $this->domains[$domain] = array();
  }
  $this->domains[$domain][] = $user;
 }
 }
 
 /**
  * Set the Email of the sender/validator
  * @param $email String
  */
 function setSenderEmail($email) {
 $parts = $this->_parseEmail($email);
 $this->from_user = $parts[0];
 $this->from_domain = $parts[1];
 }
 
 /**
 * Validate Email Addresses
 * @param String $emails Emails to validate (recipient emails)
 * @param String $sender Sender's Email
 * @return Array Associative List of Emails and their validation results
 */
 function validate($emails = false, $sender = false) {
  
  $results = array();

  if ($emails) {
   $this->setEmails($emails);
  }
  if ($sender) {
   $this->setSenderEmail($sender);
  }

  // query the MTAs on each Domain
  foreach($this->domains as $domain=>$users) {
   
  $mxs = array();
  
   // retrieve SMTP Server via MX query on domain
   list($hosts, $mxweights) = $this->queryMX($domain);

   // retrieve MX priorities
   for($n=0; $n < count($hosts); $n++){
    $mxs[$hosts[$n]] = $mxweights[$n];
   }
   asort($mxs);
 
   // last fallback is the original domain
   array_push($mxs, $this->domain);
   
   $this->debug(print_r($mxs, 1));
   
   $timeout = $this->max_conn_time/count($hosts);
    
   // try each host
   while(list($host) = each($mxs)) {
    // connect to SMTP server
    $this->debug("try $host:$this->port\n");
    if ($this->sock = fsockopen($host, $this->port, $errno, $errstr, (float) $timeout)) {
     stream_set_timeout($this->sock, $this->max_read_time);
     break;
    }
   }
  
   // did we get a TCP socket
   if ($this->sock) {
    $reply = fread($this->sock, 2082);
    $this->debug("<<<\n$reply");
    
    preg_match('/^([0-9]{3}) /ims', $reply, $matches);
    $code = isset($matches[1]) ? $matches[1] : '';
 
    if($code != '220') {
     // MTA gave an error...
     foreach($users as $user) {
      $results[$user.'@'.$domain] = false;
  }
  continue;
    }

    // say helo
    $this->send("HELO ".$this->from_domain);
    // tell of sender
    $this->send("MAIL FROM: <".$this->from_user.'@'.$this->from_domain.">");
    
    // ask for each recepient on this domain
    foreach($users as $user) {
    
     // ask of recepient
     $reply = $this->send("RCPT TO: <".$user.'@'.$domain.">");
     
      // get code and msg from response
     preg_match('/^([0-9]{3}) /ims', $reply, $matches);
     $code = isset($matches[1]) ? $matches[1] : '';
  
     if ($code == '250') {
      // you received 250 so the email address was accepted
      $results[$user.'@'.$domain] = true;
     } elseif ($code == '451' || $code == '452') {
   // you received 451 so the email address was greylisted (or some temporary error occured on the MTA) - so assume is ok
   $results[$user.'@'.$domain] = true;
     } else {
      $results[$user.'@'.$domain] = false;
     }
    
    }
    
    // quit
    $this->send("quit");
    // close socket
    fclose($this->sock);
   
   }
  }
 return $results;
 }


 function send($msg) {
  fwrite($this->sock, $msg."\r\n");

  $reply = fread($this->sock, 2082);

  $this->debug(">>>\n$msg\n");
  $this->debug("<<<\n$reply");
  
  return $reply;
 }
 
 /**
  * Query DNS server for MX entries
  * @return 
  */
 function queryMX($domain) {
  $hosts = array();
 $mxweights = array();
  if (function_exists('getmxrr')) {
   getmxrr($domain, $hosts, $mxweights);
  } else {
   // windows, we need Net_DNS
  require_once 'Net/DNS.php';

  $resolver = new Net_DNS_Resolver();
  $resolver->debug = $this->debug;
  // nameservers to query
  $resolver->nameservers = $this->nameservers;
  $resp = $resolver->query($domain, 'MX');
  if ($resp) {
   foreach($resp->answer as $answer) {
    $hosts[] = $answer->exchange;
    $mxweights[] = $answer->preference;
   }
  }
  
  }
 return array($hosts, $mxweights);
 }
 
 /**
  * Simple function to replicate PHP 5 behaviour. http://php.net/microtime
  */
 function microtime_float() {
  list($usec, $sec) = explode(" ", microtime());
  return ((float)$usec + (float)$sec);
 }

 function debug($str) {
  if ($this->debug) {
   echo htmlentities($str);
  }
 }

}

 
?>

Using the PHP SMTP Email Address Validation Class

Example Usage:

// the email to validate
$email = 'joe@gmail.com';
// an optional sender
$sender = 'user@example.com';
// instantiate the class
$SMTP_Valid = new SMTP_validateEmail();
// do the validation
$result = $SMTP_Valid->validate($email, $sender);
// view results
var_dump($result);
echo $email.' is '.($result ? 'valid' : 'invalid')."\n";

// send email? 
if ($result) {
  //mail(...);
}

Code Status

This is a very basic, and alpha version of this php class. I just wrote it to demonstrate an example. There are a few limitations. One, it is not optimized. Each email you verify will create a new MX DNS query and a new TCP connection to the SMTP server. The DNS query and TCP socket is not cached for the next query at all, even if they are to the same host or the same SMTP server.
Second, this will only work on Linux. Windwos does not have the DNS function needed. You could replace the DNS queries with the Pear Net_DNS Library if you need it on Windows.

Limitations of verifying via SMTP

Not all SMTP servers are configured to let you know that an email address does not exist on the server. If the SMTP server does respond with an "OK", it does not mean that the email address exists. It just means that the SMTP server will accept the email address and not bounce it. What it does with the actual email is different. It may deliver it to the recipient, or it may just send it to a blackhole.
If you get an invalid response from the SMTP server however, you can be pretty sure your email will bounce if you actually send it.
You should also NOT use this class to try and guess emails, for spamming purposes. You will quickly get blacklisted on Spamhaus or a similar list.

Good uses of verifying via SMTP

If you have forms such as registration forms, where users enter their email addresses. It may be a good idea to first check the syntax of the email address, to see if it is valid as per the SMTP protocol specifications. Then if it is valid, you may want to verify that the email will be accepted (will not bounce). This can allow you to notify the user of a problem with their email address, in case they made a typo, knowingly entered an invalid email. This could increase the number of successful registrations.

How it works

If you're interested in how it works, it is quite simple. The class will first take an email, and separate it to the user and host portions. The host portion, tells us which domain to send the email to. However, a domain may have an SMTP server on a different domain so we retrieve a list of SMTP servers that are available for the domain by doing a DNS query of type MX on that domain. We receive a list of SMTP servers, so we iterate through each trying to make a connection. Once connected, we send SMTP commands to the SMTP server, first saying "HELO", then setting our sender, then our recipient. If the recipient is rejected, we know an actual sending of an email will fail. Thus, we close the TCP connection to the SMTP server and quit.

Thursday, August 21, 2008

XSS (Cross Site Scripting) and stealing passwords

XSS (Cross Site Scripting) would be viewed by most web developers as the stealing of users session cookies by injecting JavaScript into a web page through URL. You do not associate it with stealing passwords, but worse then stealing session cookies, it can steal a users username and password directly from the browser.

Many users choose to have the browser remember their login credentials. So when ever they visit a login form, their username and password fields are pre-populated by the browser. Now if there is an XSS vulnerability on that login page, then a remote attacker can successfully retrieve the users username and password.

Hello World in XSS

You have a page that has an XSS vulnerability. Let say a website has a PHP page, mypage.php with the code:

<?php

// the variable is returned raw to the browser
echo $_GET['name'];

?>
Because the variable $_GET['name'] is not encoded into HTML entities, or stripped of HTML, it has an XSS vulnerability. Now all an attacker has to do is create a URL that a victim will click, that exploits the vulnerability.
mypage.php?name=%3Cscript%3Ealert(document.cookie);%3C/script%3E
This basically will make PHP write <script>alert(document.cookie);</script> onto the page, which displays a modal dialog with the value of the saved cookies for that domain.

How Does stealing passwords with XSS work?

The example above displays the cookies on the domain the webpage is on. Now imagine the same page has a login form, and the user chose to have their passwords remembered by the browser. Lets say the PHP page looks like this:

<?php

// the variable is returned raw to the browser
echo $_GET['name'];

?>

<form action="login.php">
<input type="text" name="username" />
<input type="password" name="password" />
<input type="submit" value="Login" />
</form>

Now an attacker just needs to craft a URL that retrieves the username and password. Here is an example that retrieves the password:
mypage.php?name=%3Cscript%3Ewindow.onload=function(){alert(document.forms[0].password);}%3C/script%3E

As you can see, it is just a normal XSS exploit, except it is applied to the username and password populated by the browser after the window.onload event.

Password stealing XSS vs Session Cookie stealing XSS

Well, they are both suck from a developers perspective. According to Wikipedia, 70% or so of websites are vulnerable to XSS attacks.

As a developer, I've always thought of XSS as an exploit on a users session, just as CSRF/XSRF (Cross Site Request Forgery), which requires an active session. Now, as you can see, XSS of the type described does NOT require an active session. The user does not have to be logged into the site. They could have logged out 10 years ago, but as long as the browser remembers their login credentials, the XSS exploit can steal those login credentials.

Due to its ability to be executed without having the user logged into a website, this exploit should be regarded worse then session based XSS.

Proof of Concept

Fill in the form below with dummy values and click the "Login" button.

Login Form
Username:
Password:

Now return to the same page, to simulate logging out. Now click the Exploit. This will simulate an XSS exploit on this page, and alert the saved password.

I've set up a proof of concept based on an actual XSS exploit here: http://xss-password.appjet.net/.

Preventing Stealing Passwords via XSS

The only way I can think of right now is to give your username and password fields unique names so that the browser does not remember their values. In PHP you can do this with the time() function. eg:

<input type="password" name="pass[<?php echo sha1(time().rand().'secret'); ?>]" />
The unique names prevents the browser from remembering the password field. This should work universally in all browsers.

Sunday, July 27, 2008

OpenOffice Modal Dialog "JRE Required"

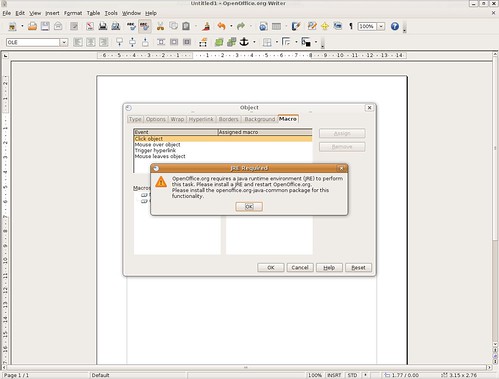
Was trying to edit a chart in OpenOffice Writer on Ubuntu today when it popped up a modal dialog box saying that it needed Java Runtime Environment, JRE, to complete the task (not in those words).

Now even after using the Ubuntu package manager, Aptitude, to install the required software OpenOffice still hangs on the modal dialog, making it impossible to close Open Office or do anything else with it. Only solution is to kill the Open Office process, which is called soffice. ie: pkill soffice.bin. First annoyance I've had with OpenOffice, which apart from this 'lil quirk is the best Document Publisher/Editor - even better then the Microsoft Office Suite.

It appears this bug is already addressed http://qa.openoffice.org/issues/show_bug.cgi?id=74940.

Friday, July 11, 2008

BlogPluse Trends

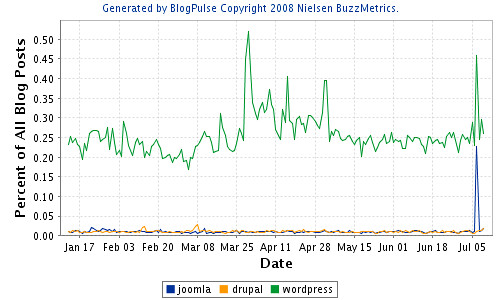
BlogPulse offers a trend search very similar to Google Trends but specifically targeted at blogs.

Here is the blog trend for the words Joomla, Drupal and Wordpress over the last 6 months.
This shows the percentage of the mentions of each word, Joomla, Drupal and Wordpress in blogs.

Lively - Googles 3D Virtual World

Just came across Lively.com which developed by Google, creates a virtual 3D world similar to SecondLife.

I haven't tested out Lively yet, since I'm running Ubuntu and it only supports Windows at the moment. In one of their blog posts however we can gather that Lively is well integrated with the Web. They have widgets that allows visitors - with Lively software installed - to jump into a Lively room embedded in a webpage.

By contrast I believe SecondLife offer APIs that offers a REST interface as well as other network level interfacing. Here is a SecondLife Facebook Application.

I'm wondering if Google will offer the same level of integration with their Lively 3D world. Would make fun Mashups.

Friday, July 4, 2008

Chaining Functions in JavaScript

A lil snippet I borrowed from the Google AJAX libraries API:

chain = function(args) {
    return function() {
     for(var i = 0; i < args.length; i++) {
      args[i]();
     }
    }
   };
You're probably familiar with the multiple window onload method written by Simon Willison which creates a closure of functions within functions in order to chain them.
Here is the same functionality using the chain function defined above.
function addLoad(fn) {
    window.onload = typeof(window.onload) != 'function' ? fn : chain([onload, fn]);
};
Chain can also be namespaced to the Function.prototype if thats how you like your JS.
Function.prototype.chain = function(args) {
    args.push(this);
    return function() {
     for(var i = 0; i < args.length; i++) {
      args[i]();
     }
    }
   };
So the multiple window onload function would be:
window.addLoad = function(fn) {
    window.onload = typeof(window.onload) != 'function' 
    ? fn : window.onload.chain([fn]);
   };

Hacking Google Loader and the AJAX Libraries API

Google recently released the AJAX Libraries API which allows you to load the popular JavaScript libraries from Google Servers. The benefits of this outlined in the description of the API.

The AJAX Libraries API is a content distribution network and loading architecture for the most popular open source JavaScript libraries. By using the google.load() method, your application has high speed, globally available access to a growing list of the most popular JavaScript open source libraries.

I was thinking of using it for a current project that would use JS heavily, however, since the project used a CMS (Joomla) the main concern for me was really how many times MooTools would be loaded. Joomla uses a PHP based plugin system (which registers observers of events triggered during Joomla code execution) and the loading of JavaScript by multiple plugins can be redundant as there is no central way of knowing which JavaScript library has already been loaded, nor is there a central repository for JavaScript libraries within Joomla.

MooTools is the preferred library for Joomla and in some cases it is loaded 2 or even 3 times redundantly. I did not want our extension to add to that mess. To solve the problem I would test for the existence of MooTools, if (typeof(MooTools) == 'undefined') and load it from Google only if it wasn't available. Now this would have worked well, however, I would have to add the JavaScript for AJAX Libraries API and it would only be loading 1 script, "MooTools", when I also had about 3-4 other custom libraries that I wanted loaded.

Now I thought, why don't I develop a JavaScript loader just like the Google AJAX Libraries API Loader. Should be just a simple function to append a Script element to the document head. So I started with:

function loadJS(src) {
    var script = document.createElement('script');
    script.src = src;
    script.type = 'text/javascript';
    timer = setInterval(closure(this, function(script) {
     if (document.getElementsByTagName('head')[0]) {
      clearTimeout(timer);
      document.getElementsByTagName('head')[0].appendChild(script);
     }
    }, [script]), 50);
   }
function closure(obj, fn, params) {
    return function() {
     fn.apply(obj, params);
    };
   }
The function loadJS would try to attach a script element to the document head, each 50 milliseconds until it succeeded.

This works but there is no way of knowing when the JavaScript file was fully loaded. Normally, the way to figure out if a JS file has finished loading from the remote server, is to have the JS file invoke a callback function on the Client JavaScript (aka: JavaScript Remoting). This however means you have to build a callback function into each JavaScript file, which is not what I wanted.

So to fix this problem I though I'd add another Interval with setInterval() to detect when the remote JS file had finished loading by testing a condition that exits when the file has completed. eg: for MooTools it would mean that the Object window.MooTools existed.

So I went about writing a JavaScript library for this, with a somewhat elaborate API, with JS libraries registering their "load condition test" and allowing their remote loading, about 1 wasted hour, (well not wasted if you learn something) only to realize that this wouldn't work for the purpose either. The reason is that it broke the window.onload functionality. Some remote files would load before the window.onload event (cached ones) and others after. This made the JavaScript already written to rely on window.onload fail.

Last Resort, how did Google Do it? I had noted earlier that if you load a JavaScript file with Google's API the file would always load before the window.onload method fired. Here is the simple test: (In the debug output, the google callback always fired first).

google.load("prototype", "1");
   google.load("jquery", "1");
   google.load("mootools", "1");
   google.setOnLoadCallback(function() {
    addLoad(function() {
     debug('google.setOnLoadCallback - window.onload');
    });
    debug('google.setOnLoadCallback')
   });
   addLoad(function() {
    debug('window.onload');
   });
   debug('end scripts');
I had to take a look at the source code for Google's AJAX Libraries API which is: http://www.google.com/jsapi to see how they achieved this.

It never occurred to me that you could force the browser to load your JavaScript before the window.onload event so I was a bit baffled. Browsing through their source code I came upon what I was looking for:

function q(a,b,c){if(c){var d;if(a=="script"){d=document.createElement("script");d.type="text/javascript";d.src=b}else if(a=="css"){d=document.createElement("link");d.type="text/css";d.href=b;d.rel="stylesheet"}var e=document.getElementsByTagName("head")[0];if(!e){e=document.body.parentNode.appendChild(document.createElement("head"))}e.appendChild(d)}else{if(a=="script"){document.write('<script src="'+b+'" type="text/javascript"><\/script>')}else if(a=="css"){document.write('<link href="'+b+'" type="text/css" rel="stylesheet"></link>'
)}}}
The code has been minified, so its a bit hard to read. Basically its the same as any javascript remoting code you'd find on the net, the but the part that jumps out is:
var e=document.getElementsByTagName("head")[0];
if(!e){e=document.body.parentNode.appendChild(document.createElement("head"))}
e.appendChild(d)
Notice how it will create a head Node and append it to the parentNode of the document body if the document head head does not exist yet.

Now that forces the browser to load the JavaScript right then, no matter what. Now following that method you can load remote JavaScript files dynamically and just used the regular old window.onload event or "domready" event and the files will be available.

Apparently this won't work on all browsers, since Google's code also has the alternative:

document.write('<script src="'+b+'" type="text/javascript"><\/script>')
with a bit of testing, you could discern which browsers worked with which and use that. I'd imagine that the latest browsers would accept the dom method and older ones would need the document.write

So my JavaScript file loading function became:

function loadJS(src) {
    var script = document.createElement('script');
    script.src = src;
    script.type = 'text/javascript';
    var head = document.getElementsByTagName('head')[0];
    if (!head) {
     head = document.body.parentNode.appendChild(document.createElement('head'));
    }
    head.appendChild(script);
    
   }

Anyways, I finally got my JavaScript library loader working just as I liked, thanks to the good work done by Google with the AJAX Libraries API.

Secure HTTP over SSH proxy with Linux

In an previous post I made I detailed how to create a secure your browser's HTTP communications by tunneling the HTTP session over an SSH proxy using Putty.

Putty is what you would use if you use a Windows desktop. If you're on a Linux Desktop you do not need Putty since you should have OpenSSH with the distribution you use.

Doing a man ssh on your Linux Desktop should give you the manual on how to use your SSH client:

SSH(1)                                                         BSD General Commands Manual                                                         SSH(1)

NAME
     ssh - OpenSSH SSH client (remote login program)

SYNOPSIS
     ssh [-1246AaCfgKkMNnqsTtVvXxY] [-b bind_address] [-c cipher_spec] [-D  [bind_address:]port] [-e escape_char] [-F configfile] [-i identity_file] [-L
         [bind_address:]port:host:hostport] [-l login_name] [-m mac_spec] [-O ctl_cmd] [-o option] [-p port] [-R  [bind_address:]port:host:hostport]
         [-S ctl_path] [-w local_tun[:remote_tun]] [user@]hostname [command]

... etc ...
The synopsis gives you the format of the command and the options that can be used with the ssh command. Of interest is the -D option. This allows you to bind the SSH session to a local address and port. Below is the part of the manual explaining the D option:
     -D [bind_address:]port
             Specifies a local “dynamic” application-level port forwarding.  This works by allocating a socket to listen to port on the local side,
             optionally bound to the specified bind_address.  Whenever a connection is made to this port, the connection is forwarded over the secure
             channel, and the application protocol is then used to determine where to connect to from the remote machine.  Currently the SOCKS4 and
             SOCKS5 protocols are supported, and ssh will act as a SOCKS server.  Only root can forward privileged ports.  Dynamic port forwardings can
             also be specified in the configuration file.

             IPv6 addresses can be specified with an alternative syntax: [bind_address/]port or by enclosing the address in square brackets.  Only the
             superuser can forward privileged ports.  By default, the local port is bound in accordance with the GatewayPorts setting.  However, an
             explicit bind_address may be used to bind the connection to a specific address.  The bind_address of “localhost” indicates that the listen‐
             ing port be bound for local use only, while an empty address or ‘*’ indicates that the port should be available from all interfaces.
Basically it means that you can start an SSH session using the OpenSSH client with a command such as:
ssh -D localhost:8000 user@example.com
and it will create a SOCKS proxy on port 8000 that will tunnel your HTTP connection over SSH to the server at example.com under the username user.

Now you can configure your applications that access the internet to use the secure HTTP tunnel you've created to your remote SSH server. The applications are not limited to web browsers, you can configure your Instant Messenger, Skype, Games etc. to use the socks proxy, as long at the communication protocol is supported.

Configuring Firefox to use the Socks Proxy

  • Tools -> Options -> Advanced -> Network
  • Under Connection click on the Settings button
  • Choose Manual Proxy configuration, and SOCKS v5
  • Fill in localhost for the host, and 8000 (or the port number you used) for the port
  • Click OK and reload the page

Now what you can do is have the the ssh session start up when you start your desktop. Thats if you want to use your secure tunnel every time you use Firefox or whatever program you have configured to use it. On Ubuntu (Debian) you'd add a shell script to your home directory.
Example:

#!/bin/sh
ssh -D localhost:8000 user@example.com
That should start up the ssh connection and create the socks proxy when you log in. The other alternative is to create a launcher and use ssh -D localhost:8000 user@example.com as the command, allowing you to launch the proxy whenever you need.

You can also set up an ssh key for authentication instead of having to log in. This is detailed in other posts: http://pkeck.myweb.uga.edu/ssh/ and http://sial.org/howto/openssh/publickey-auth/. This allows you to use the proxy transparently in the background without having to start it and log in.

For Firefox you can switch between proxy and direct connection using the switchproxy extension.

Disclaimer: Please note that it is your responsibility to use the information in this article within the legal laws of your country. Some countries do not allow encryption of internet traffic, therefore you SHOULD NOT use this resource if you live in such a country. I provide this information without warranty and free of charge and will not be held accountable for any damages lost due to its use.. etc etc.

Monday, June 23, 2008

Google Trends for websites

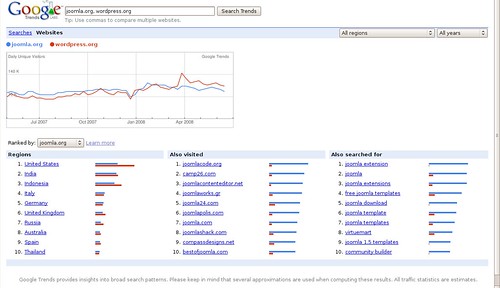
The Google trends for websites, which was released by Google 3 days ago, is really something to check out if you're interested in comparing website metrics between different websites and across geographical locations.

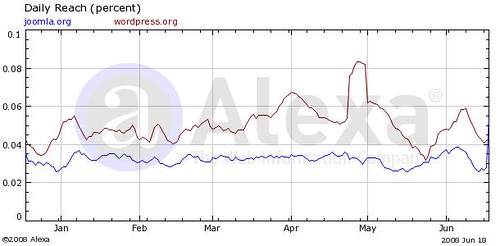
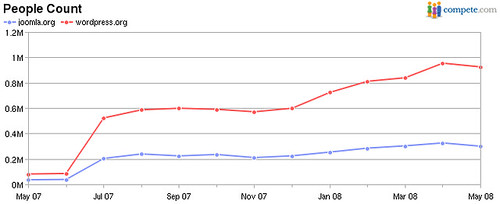
Alexa and Compete offer similar services. One of the features that stands out with Google trends is that it displays related websites that visitors to the website being viewed visit in descending order of visitors. This related websites are also filtered when filtering down to single geographic locations. This makes Google trends for websites quite a bit more powerful for your research. It allows you to view a websites competitors in each geographic location or allows link building and search engine optimization for a website for each geographic location.

Joomla vs Wordpress on Google Trends for websites

Joomla vs Wordpress on Alexa Website Analytics

Joomla vs Wordpress on Compete Website Analytics

Search Engine Land and Matt Cutts also blogged about the new google trends for websites.

Sunday, June 22, 2008

Online Application Development Platforms and Services

Everyone is offering Application development as a service!

Appjet

AppJet is the easiest way to create a web app. Just type some code into a box, and we'll host your app on our servers.
http://appjet.com/

AppPad

AppPad provides a place to create web applications completely in HTML and Javascript. AppPad gives you:
http://apppad.com/

Bungee Connect

Bungee Connect is the most comprehensive Platform-as-a-Service (PaaS) — significantly reducing the complexities, time and costs required to build and deliver web applications.
http://www.bungeelabs.com/

CogHead

Coghead is a 100% web-based system that allows knowledge workers to create their own custom business applications. There’s never any software to install or servers to maintain. Just think it, build it and share it!
http://www.coghead.com/

Google App Engine

Google App Engine enables you to build web applications on the same scalable systems that power Google applications.
http://code.google.com/appengine/

I was going to add more but got bored after reaching G. Now I'm just waiting for that meta web application development environment that integrates all the above with a RESTful API. lol...

Sunday, June 15, 2008

JavaScript Cross Window Communication via Cookies

Using JavaScript we can communicate between browser windows given that we have a reference to each window. When a new window is created the the JavaScript method window.open() it returns a reference to the new window. The child window, also has a reference to the parent window that created it via the window.opener window object. These references allow the two windows to communicate with and manipulate each other.

There are times however, when we need to communicate with an open window for which there is no window object reference. A typical example of this is when a popup window is created, then the parent window is reloaded. When reloading the parent, all JavaScript objects are "trashed", along with the reference to the open popup window. Here is where cookies come into play - they are not trashed.

The problem with cookies is that it only saves strings, so you can't write a reference to a window object directly to a cookie, since serializing the reference is not possible. However, since both the child window and the parent window are able to read and write cookies, then they have a medium for which they can communicate. Even if the medium only allows strings.

To demonstrate how communicating between windows with cookies would work, lets assume we want to open a window, and then close it a few seconds later.

var win = window.open('child.html');
setTimeout(function() { win.close(); }, 5000);
The code will open a child window, and close it after 5 seconds using the reference to the child window and the method close(). However if we didn't have a reference for some reason, we would not be able to invoke the close method. So lets see how it could be done with cookies:
window.open('child.html');
setTimeout(function() { setCookie('child', 'close'); }, 5000);
Here we open a window but do not save a reference. Then after 5 seconds we write 'close', to the cookie named 'child' (using the pseudo setCookie() function). This does not do anything by itself, but if the child window was expecting the cookie, it could close itself when it read 'close'. Lets assume the following JS is in child.html.
// child.html
setInterval(function() { getCookie('child') == 'close' ? this.close() : ''; }, 500);
This would check the cookie every half a seconds and close the window if the cookie read 'close'.

Using this method we can send any commands to any open windows and have them execute it without having a reference to that window.

Friday, June 6, 2008

Blocking Advertisements with a Hosts file, Apache and PHP

The Hosts file is located at /etc/hosts on Linux and %SystemRoot%\system32\drivers\etc\ on Windows XP and Vista. It maps host names to IP addresses and takes precedence over the DNS server. So if you add an entry in your hosts file:

207.68.172.246 google.com 
Then every time you type google.com you will be taken to msn.com instead, since 207.68.172.246 is the IP address of msn.com.

Knowing this, you can point any domain, to an IP address of choice using the Hosts file. Therefore, we can use it to block any domains that hosts unwanted advertising or malware.

Modifying your Hosts File to block Advertisements and Malware

There are many sites offering host files which block advertisments and malware. I use the one on http://www.mvps.org/winhelp2002/hosts.htm.
Here is the txt version of the hosts file: http://www.mvps.org/winhelp2002/hosts.txt

Here is an example of what the entries look like, there the list contains a lot more, about 18, 000 entries at this time.

# [Misc A - Z]
127.0.0.1  ad.a8.net
127.0.0.1  asy.a8ww.net
127.0.0.1  www.abx4.com #[Adware.ABXToolbar]
127.0.0.1  acezip.net #[SiteAdvisor.acezip.net]
127.0.0.1  www.acezip.net #[Win32/Adware.180Solutions]
127.0.0.1  phpadsnew.abac.com
127.0.0.1  a.abnad.net
127.0.0.1  b.abnad.net
127.0.0.1  c.abnad.net #[eTrust.Tracking.Cookie]
127.0.0.1  d.abnad.net
127.0.0.1  e.abnad.net
127.0.0.1  t.abnad.net
127.0.0.1  banners.absolpublisher.com
127.0.0.1  tracking.absolstats.com
127.0.0.1  adv.abv.bg
127.0.0.1  bimg.abv.bg
127.0.0.1  www2.a-counter.kiev.ua
127.0.0.1  accuserveadsystem.com
127.0.0.1  www.accuserveadsystem.com
127.0.0.1  gtb5.acecounter.com
127.0.0.1  gtcc1.acecounter.com
127.0.0.1  gtp1.acecounter.com #[eTrust.Tracking.Cookie]
127.0.0.1  acestats.com
127.0.0.1  www.acestats.com
127.0.0.1  achmedia.com
127.0.0.1  ads.active.com
127.0.0.1  am1.activemeter.com
127.0.0.1  www.activemeter.com #[eTrust.Tracking.Cookie]
127.0.0.1  ads.activepower.net
127.0.0.1  stat.active24stats.nl #[eTrust.Tracking.Cookie]
127.0.0.1  web.acumenpi.com #[AdvertPro]
127.0.0.1  ad.ad24.ru
127.0.0.1  at.ad2click.nl
127.0.0.1  cms.ad2click.nl
127.0.0.1  banner.ad.nu
127.0.0.1  ad-up.com
127.0.0.1  www.ad-up.com
You will need to download the txt file and append the entries to your hosts file.

Now once the hosts file is in effect, when you browse any website in firefox or IE or any other browser, 99% of the advertisements will not be displayed.

Setting up Apache to display a custom page or message for blocked Advertisements and Malware

Each entry in the hosts file blocks unwanted sites by resolving their domain name to 127.0.0.1 which is the IP reserved for looping back to your own IP. So all the requests for advertising sites will instead be made back to your IP. The problem with this is because there is no website on your localhost, then the browser will display an error in place of the ads.

If you're a web developer, you'll likely have a version of Apache or some other HTTP server running on your localhost. So you'll likely get a 404 error in place of the ads. You can resolve this by adding a virtual host entry into your httpd.conf file that will display a custom page instead of the 404.

To resolve this you can set up a virtual host to catch all requests made to your Apache server, for the blocked hosts. Assuming you always access your local server via the URL http://localhost/ then you probably don't need the other host possibilities on 127.0.0.1. So your virtual host could look something like:

<VirtualHost 127.0.0.1>
ServerAdmin webmaster@adblock
DocumentRoot /var/www/adblock/
ErrorDocument 404 /404.html
ErrorLog /etc/log/adblock/error.log
TransferLog /etc/log/adblock/access.log
</VirtualHost>
This will catch all requests made to 127.0.0.1. The requests will most likely have a path that doesn't exist in your file structure in /var/www/adblock/ so it will generate a 404 error. You therefore need a custom 404 document which is defined in ErrorDocument 404 /404.html. This can have the simple line, "ad or malware blocked" or something on those lines.

Now localhost also resolves to 127.0.0.1 so you will need to make sure you have a virtual host for the host localhost.

The other thing you could do instead of setting up a virtual host, and it may be simpler, is create a custom 404 document for your current setup. You can do this via a directive directly in httpd.conf like: ErrorDocument 404 /404.php. Notice that it is a PHP so you can use some PHP code to customize the error message. What you'll want is to have the PHP detect if the request was for a blocked site, and if so show your message: "site blocked", but show the regular 404 page for your actual website.

How you detect if the request is from a one of the blocked hosts is by comparing the requested host with the list of hosts in your hosts file that are blocked. The host requested is in the $_SERVER['SERVER_NAME'] variable. Since the list of blocked hosts is large and you probably do not want to read all of those with your php script each time an advertisement is blocked, you can apply the reverse comparison - if the requested host is not in the list of your valid hosts, then it is a blocked host. An example:

// our valid hosts
$valid_hosts = array('localhost', 'my.host.joe', 'my.other.host.peter');
// check if the requested host is a valid one
if (!in_array($_SERVER['SERVER_NAME'], $valid_hosts)) {
    echo 'ad or malware blocked'; // display message in place of blocked ad
} else {
    include('/404.html'); // display regular 404 page
}
Now, when you visit those websites with pesky advertisements and popups, you get a neat little line saying "ad or malware blocked" in the place of those ads.

Thursday, June 5, 2008

Synchronizing Date and Time in different Timezones with PHP, MySQL and JavaScript

How do you show the correct date and time (timestamp) to users in differnet time zones? In theory it should be simple:

Save your your date and time with the correct timezone

The date and time with timezone is a timestamp. Though implementations differ, timestamps basically contain the same information (date/time and timezone).The timezone can be explicitly recorded in the timestamp (eg: 2005-10-30 T 10:45 UTC) or implicitly taken from the context in which the timestamp was generated or recorded (eg: unix timestamp is dependent on timezone of server generating the timestamp).

Something as simple as saving a timestamp in mysql with PHP can be not so simple due to the difference in the timestamp representation in the two languages.

The PHP timestamp is defined as the number of seconds since the Unix Epoch (January 1 1970 00:00:00 GMT) while the mysql timestamp is a representation of the present date and time in the format YYYY-MM-DD HH:MM:SS.

If you save the timestamp as a mysql timestamp field, then the timestamp is saved as UTC, however, when you access the timestamp it is converted to the timezone set in the mysql server, so basically you don't get to see the stored UTC version of the timestamp. If you save it as a PHP timestamp in a varchar or unsigned int field then it would be subject to the the PHP servers timezone. So in essence both the MySQL and PHP timestamp a dependent on the timezone of their respective servers.

Whichever format you save it in, just remember that both the PHP and MySQL timestamps reference the timezone on the server they are saved on, PHP during generation of the timestamp, and mysql during retrieval.

Retrieve the timezone of the user to whom you will display the date and time to

The easy way to do this is ask the user what their timezone is. You see this used in many registration forms on websites as well as many open source forums, CMSs, blog software etc. However, not every user will even bother giving you the correct timezone.

You can use JavaScript if it is available on the browser:

var tz = (new Date().getTimezoneOffset()/60)*(-1);
This depends on the users computer's clock, so if it is set wrong, then you will get a wrong result. Time is relative however, so if a user wants to be a few hours behind, let them be.

You can use the users IP address to assume their geographic location and thus their timezone. This can be done server side and thus is not dependent on the users browser having JavaScript. Using the IP to determine timezone is dependent on the accuracy of your IP geocoding service you use. Here is an example using the hostip.info API for geocoding and earthtools.org for lat/long conversion to timezone.

<?php
/**
* Retrieves the Timezone by the IP address
* @param String $IP (optional) IP address or remote client IP address is used
*/
function getTimeZoneByIP($IP = false) {

 // timezone
 $timezone = false;

 // users IP
 $IP = $IP ? $IP : $_SERVER['REMOTE_ADDR'];

 // retrieve geocoded data from http://hostip.info/ API in plain text
 if ($geodata = file('http://api.hostip.info/get_html.php?ip='.$IP.'&position=true')) {
  // create an associative array from the data
  $geoarr = array();
  foreach($geodata as $line) {
   list($name, $value) = explode(': ', $line);
   $geoarr[$name] = $value;
  }
  
  // retrieve lat and lon values
  $lat = trim($geoarr['Latitude']);
  $lon = trim($geoarr['Longitude']);
  
  if (strlen($lat) > 0 && strlen($lon) > 0) {
   // pass this lat and long to http://www.earthtools.org/ API to get Timezone Offset in xml
   $tz_xml = file_get_contents('http://www.earthtools.org/timezone-1.1/'.$lat.'/'.$lon);
   // lets parse out the timezone offset from the xml using regex
   if (preg_match("/<offset>([^<]+)<\/offset>/i", $tz_xml, $match)) {
    $timezone = $match[1];
   }
  }

 }
 return $timezone;
}
?>

You can also use a combination of the three in order to correlate the data and get a better guess of the timezone.

Calculate the difference in hours between the saved date and time and the users date and time

Now that we have the timestamp and the users timezone, we just need to adjust the timestamp to their timezone. First we need to calculate the difference between the timezone the timestamp is saved in, as the users timezone.

$user_tz_offset = $tz_user - $tz_timestamp; 
where $user_tz_offset is how far ahead or behind in hours the user timezone is from the timestamps timezone.

Add the difference in hours to the saved date and time and display

Now we have all we need to show the correct time to the user based on their timezone. Example in pseudo code:

$user_tz_offset = $tz_user - $tz_timestamp; 
$users_timestamp = $timestamp + $user_tz_offset;

Wednesday, June 4, 2008

PHP Code Performance Profiling on Ubuntu

A few options for code profiling in PHP:

XDebug

XDebug consists of a PHP extension, and requires an XDebug client to view the output generated by XDebug. It writes profiling data by default to /tmp. What we want to do is install XDebug, enable profiling and view the files generated using Kcachegrind, which is an XDebug client that comes default with Ubuntu.

To install XDebug on Ubuntu is as simple as the command:

sudo apt-get install php5-xdebug
This assumes you installed Apache2 and PHP5 using aptitude. Otherwise you'd probably want to follow one of these instructions on installing XDebug:
http://ubuntuforums.org/showthread.php?t=525257
http://2bits.com/articles/setting-up-xdebug-dbgp-for-php-on-debian-ubuntu.html
http://www.apaddedcell.com/easy-php-debugging-ubuntu-using-xdebug-and-vim

Once you've installed xdebug you will need to enable php code profiling by setting the xdebug.profiler_enable setting to 1 in php.ini. You can view the php.ini settings using the command:

php -r 'phpinfo();'
To narrow down to just the xdebug settings use:
php -r 'phpinfo();' | grep xdebug
Note: php --info | xdebug will work also.

If you used the simple sudo apt-get install php5-xdebug to install xdebug, then it should have automatically created an ini file: /etc/php5/conf.d/xdebug.ini which is included with the php.ini.

Edit the php.ini file or /etc/php5/conf.d/xdebug.ini and add the line:

xdebug.profiler_enable=1
Example: sudo gedit /etc/php5/conf.d/xdebug.ini

After saving this you will need to restart Apache in order to reload the php settings.

sudo /etc/init.d/apache2 restart

You will then need an xdebug client to display the profiling information. Kcachegrind is installed by default in Ubuntu. Open Kcachegrind kcachegrind & and use it to open a file generated by xdebug. This will be found in the directory specified in php.ini for the directive xdebug.trace_output_dir which defaults to /tmp. The files generated by Xdebug are prefixed with cachegrind.out.. So you can view a list of these files using the command ls /tmp | grep cachegrind.out.

How to interpret the Xdebug profiling information displayed in Kcachegrind is described at: http://www.xdebug.org/docs/profiler under Analysing Profiles.

Benchmark

Benchmark is a Pear package. Documentation is found at: http://pear.php.net/package/Benchmark/docs/latest/Benchmark/Benchmark_Profiler.html

A simple usage would be:

// load class and instantiate and instance
require_once 'Benchmark/Profiler.php';
$profiler = new Benchmark_Profiler();

// start profiling
$profiler->start();

// do some stuff
myFunction();

// stop
$profiler->stop();

// display directly in PHP output
$profiler->display();

myFunction could look something like:
function myFunction() {
     global $profiler;

     $profiler->enterSection('myFunction');

     //do something
     $profiler->leaveSection('myFunction');

     return;
 }

Benchmark allows you to do profiling directly in your PHP script. One of the disadvantages of XDebug is that you have to enable profiling in PHP.ini and it would start creating profiling dump files in /tmp. These files over time could get very large if you forget to turn off XDebug. Unfortunately you can't set the XDebug profiling directive, xdebug.profiler_enable directly in PHP with ini_set().

Benchmark would seem like a bit more work compared to XDebug, however, if working with large code bases. The advantage of being able to apply it to a single file however makes it ideal for profiling live php websites. You could easily track down a problem occuring on a live site without having to recreate and simulate the live site and data in a development environment.

For example you could have Benchmark only display profiling data if requested via the URL:

// load class and instantiate and instance
require_once 'Benchmark/Profiler.php';
$profiler = new Benchmark_Profiler();

// start profiling
$profiler->start();

// do some stuff
myFunction();

// stop
$profiler->stop();

// only display if requested by me
if (isset($_GET['debug'])) $profiler->display();

I haven't got around to the other two alternatives for PHP code profiling. I will update this entry if I do.

Tuesday, June 3, 2008

Ringo Ends Service

It looks like Ringo, which is a popular social network, has decided to end its service. Here is part of the email I received 2 hours ago.

Dear Ringo member,

After much consideration we have decided to end the Ringo service.

As of June 30, 2008 the Ringo service is ending and you will no longer have access to your Ringo account. 

Twitter is faster at getting updated with news like this. A search through google won't reveal any news of this since it is only 2 or so hours old, however, a search through twitter got quite a lot of results. http://twittier.com/?q=ringo

The originating server of the email seems to check out. It originates from the tickle.com which is authoritative for ringo's mail transfer. (I consider all email guilty until proven innocent)

Is this the first death of a social network? I believe so, at least a major one.

It appears ringo.com hasn't been growing at all for the past year, if not slowly dying.

Farewell Ringo.

Monday, May 26, 2008

Converting XML to JSON

Why would I want to convert XML to JSON. Mainly because JSON is a subset of JavaScript (JavaScript Object Notation) and XML isn't. It is much easier to manipulate JavaScript Objects, then it is to manipulate XML. This is because Objects are native to JavaScript, where as XML requires an API, the DOM, which is harder to use. DOM implementations in browsers are not consistent, while you will find Objects and their methods more or less the same across browsers.

Since, most of the content/data available on the web is in XML format and not JSON, converting XML to JSON is necessary.

The main problem is that there is no standard way of converting XML to JSON. So when converting, we have to develop our own rules, or base them on the most widely used conversion rules. Lets see how the big boys do it.

Rules Google GData Uses to convert XML to JSON

A GData service creates a JSON-format feed by converting the XML feed, using the following rules:

Basic

  • The feed is represented as a JSON object; each nested element or attribute is represented as a name/value property of the object.
  • Attributes are converted to String properties.
  • Child elements are converted to Object properties.
  • Elements that may appear more than once are converted to Array properties.
  • Text values of tags are converted to $t properties.

Namespace

  • If an element has a namespace alias, the alias and element are concatenated using "$". For example, ns:element becomes ns$element.

XML

  • XML version and encoding attributes are converted to attribute version and encoding of the root element, respectively.

Google GData XML to JSON example

This is a hypothetical example, Google GData only deals with RSS and ATOM feeds.

<?xml version="1.0" encoding="UTF-8"?>
<example:user domain="example.com">
 <name>Joe</name>
 <status online="true">Away</status>
 <idle />
</example:user>
{
 "version": "1.0",
 "encoding": "UTF-8",
 "example$user" : {
  "domain" : "example.com",
   "name" : { "$t" : "Joe" },
   "status" : {
    "online" : "true",
    "$t" : "Away"
   },
   "idle" : null
  }
}

How Google converts XML to JSON is well documented. The main points being that XML node attributes become strings properties, the node data or text becomes $t properties and namespaces are concatenated with $.
http://code.google.com/apis/gdata/json.html#Background

Rules Yahoo Uses to convert XML to JSON

I could not find any documentation on the rules Yahoo uses to convert its XML to JSON in Yahoo Pipes, however, by looking the output of a pipe in RSS format and the corresponding JSON format you can get an idea of the rules used.

Basic

  • The feed is represented as a JSON object; each nested element or attribute is represented as a name/value property of the object.
  • Attributes are converted to String properties.
  • Child elements are converted to Object properties.
  • Elements that may appear more than once are converted to Array properties.
  • Text values of tags are converted to string properties of the parent node, if the node has no attributes.
  • Text values of tags are converted to content properties, if the node has attributes.

Namespace

  • Unknown.

XML

  • XML version and encoding attributes are removed/ignored - at least in the RSS sample I looked at.

The only problem I see with the rules Yahoo Pipes uses is that if an XML node has an attribute named "content", then it will conflict with the Text value of the node/element giving the programer an unexpected result.

Yahoo Pipes XML to JSON example

<?xml version="1.0" encoding="UTF-8"?>
<example:user domain="example.com">
 <name>Joe</name>
 <status online="true">Away</status>
 <idle />
</example:user>
{
 "example??user" : {
  "domain" : "example.com",
   "name" : "Joe",
   "status" : {
    "online" : "true",
    "content" : "Away",
   },
   "idle" : ??
  }
}

XML.com on rules to convert XML to JSON

The article on XML.com by Stefan Goessner gives a list of possible XML element structures and the corresponding JSON Objects.
http://www.xml.com/pub/a/2006/05/31/converting-between-xml-and-json.html

Pattern XML JSON Access
1 <e/> "e": null o.e
2 <e>text</e> "e": "text" o.e
3 <e name="value" /> "e":{"@name": "value"} o.e["@name"]
4 <e name="value">text</e> "e": { "@name": "value", "#text": "text" } o.e["@name"] o.e["#text"]
5 <e> <a>text</a> <b>text</b> </e> "e": { "a": "text", "b": "text" } o.e.a o.e.b
6 <e> <a>text</a> <a>text</a> </e> "e": { "a": ["text", "text"] } o.e.a[0] o.e.a[1]
7 <e> text <a>text</a> </e> "e": { "#text": "text", "a": "text" } o.e["#text"] o.e.a

If we translate this to the rules format given by Google it would look something like:

Basic

  • The feed is represented as a JSON object; each nested element or attribute is represented as a name/value property of the object.
  • Attributes are converted to @attribute properties. (attribute name preceeded by @)
  • Child elements are converted to Object properties, if the node has attributes or child nodes.
  • Elements that may appear more than once are converted to Array properties.
  • Text values of tags are converted to string properties of the parent node, if the node has no attributes or child nodes.
  • Text values of tags are converted to #text properties, if the node has attributes or child nodes.

Namespace

  • If an element has a namespace alias, the alias and element are concatenated using ":". For example, ns:element becomes ns:element. (ie: namespaced elements are treated as any other element)

XML

  • XML version and encoding attributes are not converted.

XML.com XML to JSON example

<?xml version="1.0" encoding="UTF-8"?>
<example:user domain="example.com">
 <name>Joe</name>
 <status online="true">Away</status>
 <idle />
</example:user>
{
 "example:user" : {
  "@attributes" : { "domain" : "example.com" },
   "name" : { "#text" : "Joe" },
   "status" : {
    "@attributes" : {"online" : "true"},
    "#text" : "Away"
   },
   "idle" : null
 }
}

Other rules being used to convert XML to JSON

Here is a blog on the topic of an XML to JSON standard. http://khanderaotech.blogspot.com/2007/03/mapping-between-xml-json-need-standard.html.
A good discussion on the differences between XML and JSON. http://blog.jclark.com/2007/04/xml-and-json.html

We need a standard way of converting XML to JSON

I'm tired of hearing the "XML vs JSON" debate. Why not just make them compatible. Now, that we see just how many different rules are being used, we can definitely see another reason why a standard would come in handy. But till then, I think I'll add to the confusion and come up with my own ruleset.

My rules of converting XML to JSON

My rules are simple and is based on the XML DOM. The DOM represents XML as DOM Objects and Methods. We will use the DOM objects only since JSON does not use methods. So each Element would be an Object, and each text node #text property and attributes an @attributes object with string properties of the attribute names. The only difference from the DOM Objects representation in JavaScript is the @ sign in front of the attributes Object name - this is to to avoid conflicts with elements named "attributes". The DOM goes around this by having public methods to select child nodes, and not public properties (the actual properties are private, and thus not available in an object notation).

Basic

  • The feed is represented as a JSON object; each nested element or attribute is represented as a name/value property of the object.
  • Attributes are converted to String properties of the @attributes property.
  • Child elements are converted to Object properties.
  • Elements that may appear more than once are converted to Array properties.
  • Text values of tags are converted to $text properties.

Namespace

  • Treat as any other element.

XML

  • XML version and encoding attributes are not converted.

In order to convert XML to JSON with JavaScript, you first have to convert the XML to a DOM Document (to make things simpler). Any major browser willd do this either automatically in the case of the XML/XHTML Document you are viewing, or an XML document retrieved via XMLHttpRequest. But if all you have is an XML string, something like this will do:

function TextToXML(strXML) {
 var xmlDoc = null;
 try {
  xmlDoc = (document.all)?new ActiveXObject("Microsoft.XMLDOM"):new DOMParser();
  xmlDoc.async = false;
 } catch(e) {throw new Error("XML Parser could not be instantiated");}
 var out;
 try {
  if(document.all) {
   out = (xmlDoc.loadXML(strXML))?xmlDoc:false;
  } else {  
   out = xmlDoc.parseFromString(strXML, "text/xml");
  }
 } catch(e) { throw new Error("Error parsing XML string"); }
 return out;
} 

This will give you the XML represented as a DOM Document, which you can traverse using the DOM methods.

Now all you'll have to do to convert the DOM Document to JSON is traverse it, and for every Element, create an Object, for its attributes create an @attributes Object, and a #text attribute for text nodes and repeat the process for any child elements.

/**
 * Convert XML to JSON Object
 * @param {Object} XML DOM Document
 */
xml2Json = function(xml) {
 var obj = {};
 
 if (xml.nodeType == 1) { // element
  // do attributes
  if (xml.attributes.length > 0) {
   obj['@attributes'] = {};
   for (var j = 0; j < xml.attributes.length; j++) {
    obj['@attributes'][xml.attributes[j].nodeName] = xml.attributes[j].nodeValue;
   }
  }
  
 } else if (xml.nodeType == 3) { // text
  obj = xml.nodeValue;
 }
 
 // do children
 if (xml.hasChildNodes()) {
  for(var i = 0; i < xml.childNodes.length; i++) {
   if (typeof(obj[xml.childNodes[i].nodeName]) == 'undefined') {
    obj[xml.childNodes[i].nodeName] = xml2Json(xml.childNodes[i]);
   } else {
    if (typeof(obj[xml.childNodes[i].nodeName].length) == 'undefined') {
     var old = obj[xml.childNodes[i].nodeName];
     obj[xml.childNodes[i].nodeName] = [];
     obj[xml.childNodes[i].nodeName].push(old);
    }
    obj[xml.childNodes[i].nodeName].push(xml2Json(xml.childNodes[i]));
   }
   
  }
 }

 return obj;
};

Converting XML to Lean JSON?

We could make the JSON encoding of the XML lean by using just "@" for attributes and "#" for text in place of "@attributes" and "#text":

{
 "example:user" : {
  "@" : { "domain" : "example.com" },
   "name" : { "#" : "Joe" },
   "status" : {
    "@" : {"online" : "true"},
    "#" : "Away"
   },
   "idle" : null
 }
}

You may notice that "@" and "#" are valid as javascript property names, but not as XML attribute names. This allows us to encompass the DOM representation in object notation, since we are swapping DOM functions for Object properties that are not allowed as XML attributes and thus will not get any collisions. We could go further and use "!" for comments for example, and "%" for CDATA. I'm leaving these two out for simplicity.

What about converting JSON to XML?

If we follow the rules used to convert XML to JSON, it should be easy to convert JSON back to XML. We'd Just need to recurse through our JSON Object, and create the necessary XML objects using the DOM methods.

/**
 * JSON to XML
 * @param {Object} JSON
 */
json2Xml = function(json, node) {
 
 var root = false;
 if (!node) {
  node = document.createElement('root');
  root = true;
 }
 
 for (var x in json) {
  // ignore inherited properties
  if (json.hasOwnProperty(x)) {
  
   if (x == '#text') { // text
    node.appendChild(document.createTextNode(json[x]));
   } else  if (x == '@attributes') { // attributes
    for (var y in json[x]) {
     if (json[x].hasOwnProperty(y)) {
      node.setAttribute(y, json[x][y]);
     }
    }
   } else if (x == '#comment') { // comment
   // ignore
   
   } else { // elements
    if (json[x] instanceof Array) { // handle arrays
     for (var i = 0; i < json[x].length; i++) {
      node.appendChild(json2Xml(json[x][i], document.createElement(x)));
     }
    } else {
     node.appendChild(json2Xml(json[x], document.createElement(x)));
    }
   }
  }
 }
 
 if (root == true) {
  return this.textToXML(node.innerHTML);
 } else {
  return node;
 }
 
};

This really isn't a good example as I couldn't find out how to create Elements using the XML DOM with browser Javascript. Instead I had to create Elements using the document.createElement() and text nodes with document.createTextNode() and use the non-standard innerHTML property in the end. The main point demonstrated is how straight forward the conversion is.

What is the use of converting JSON to XML

If you are familiar with creating xHTML via the DOM methods, you'll know how verbose it can be. By using a simple data structure to represent XML, we can remove the repetitive code needed to create the xHTML. Here is a function that creates HTML Elements out of a JSON Object.

/**
 * JSON to HTML Elements
 * @param {String} Root Element TagName
 * @param {Object} JSON
 */
json2HTML = function(tag, json, node) {
 
 if (!node) {
  node = document.createElement(tag);
 }
 
 for (var x in json) {
  // ignore inherited properties
  if (json.hasOwnProperty(x)) {
  
   if (x == '#text') { // text
    node.appendChild(document.createTextNode(json[x]));
   } else  if (x == '@attributes') { // attributes
    for (var y in json[x]) {
     if (json[x].hasOwnProperty(y)) {
      node.setAttribute(y, json[x][y]);
     }
    }
   } else if (x == '#comment') { // comment
   // ignore
   
   } else { // elements
    if (json[x] instanceof Array) { // handle arrays
     for (var i = 0; i < json[x].length; i++) {
      node.appendChild(json2HTML(json[x][i], document.createElement(x)));
     }
    } else {
     node.appendChild(json2HTML(json[x], document.createElement(x)));
    }
   }
  }
 }
 
 return node;
 
};

Lets say you wanted a link <a title="Example" href="http://example.com/">example.com</a>. With the regular browser DOM methods you'd do:

var a = document.createElement('a');
a.setAttribute('href', 'http://example.com/');
a.setAttribute('title', 'Example');
a.appendChild(document.createTextNode('example.com');
This is procedural and thus not very pleasing to the eye (unstructured) as well as verbose. With JSON to XHTML you would just be dealing with the data in native JavaScript Object notation.
var a = json2HTML('a', {
 '@attributes': { href: 'http://example.com/', title: 'Example' },
 '#text': 'example.com'
});

That does look a lot better. This is because JSON seperates the data into a single Object, which can be manipulated as we see fit, in this case with json2HTML().

If you want nested elements:

var div = json2HTML('div', {
 a : {
  '@attributes': { href: 'http://example.com/', title: 'Example' },
  '#text': 'example.com'
 }
});

Which gives you

<div><a title="Example" href="http://example.com/">example.com</a></div>

The uses of converting JSON to XML are many. Another example, lets say you want to syndicate an RSS feed. Just create the JSON Object with the rules given for conversion between XML and JSON, run it through your json2Xml() function and you should have a quick and easy RSS feed. Normally you'd be using a server side language other than JavaScript to generate your RSS (however Server Side JavaScript is a good choice also) but since the rules are language independent, it doesn't make a difference which language is used, as long as it can support the DOM, and JSON.
Wednesday, May 21, 2008

Twittier - a live view of twitter

A preview of Twittier.com is available.

What is does is retrieve updates from the twitter public timeline, or specific topics using summize.com and presents it in a simple view.

On receiving a message it extracts "relevant" keywords and displays a "live cloud view" of keywords. This cloud view is updating in real time, and thus gives you an idea of the trending topics on twitter at any given time.

At the moment it doesn't work on IE6, though I haven't tested IE7. I'm developing this on Firefox3 beta but Firefox2.0 should display it fine also.

The mashup is fully client side, using the MooTools JavaScript library and summize.com for data.

"Windows Fiji" Beta testing begins

Beta testing of Windows Media Center Edition +1, codename "Fiji", has begun, according to this article on Znet.

windows fiji on twittier.com

Thursday, May 15, 2008

Google Maps Street View

Where the hell have I been? Almost 1 year later and I find out about Google Maps Street View and it is amazing. More info on the Street View at Techcrunch and Lifehacker.

Friday, May 9, 2008

Today's Woot, JS Modular

I took a screenshot of todays woot on woot. View Screenshot. Its hilarious...

update from Milyusha on twitter.

Tuesday, May 6, 2008

Suva, Fiji Mapped on OpenStreetMap.org

Watching live twits for the keyword "Suva" in the twitter mashup I'm creating, I came across this twit from strangepants:

Slowly mapping Suva on OpenStreetMap.org: http://tinyurl.com/5bszrn.
Checking it out I find the beginning of an up to date and accurate street map for Suva, Fiji.

Even living in Fiji you can't find good maps of Suva. The ones sold here are outdated with inaccurate street names and locations. Google Maps does not have coverage of Suva and Google earth has very limited coverage.

This is another example of how openly edited initiatives (eg: OpenStreetMap.org) are superior to closed proprietary initiatives (eg: Google Maps, Yahoo Maps).

Monday, May 5, 2008

IE8 and the Activities Feature for Developers

The IE8 Features for developers is pretty impressive. Heres is a bit on the "Activities" Feature.

Activities

This should probably have a better name for developers, something like "open service". (ed. Its actually called OpenService and there is a proposed extension on the MicroFormats Wiki. ) The IE8 feature allows a developer to embed a web service into the HTML page. If you're familiar with Open Search, this is a very similar protocol for embedding any service into a HTML page and follows the same technique.

Open Search is an XML format for mapping out query URLs for Search Engines. EG:

<?xml version="1.0" encoding="UTF-8"?>
 <OpenSearchDescription xmlns="http://a9.com/-/spec/opensearch/1.1/">
   <ShortName>Web Search</ShortName>
   <Description>Use Example.com to search the Web.</Description>
   <Tags>example web</Tags>
   <Contact>admin@example.com</Contact>
   <Url type="application/rss+xml" 
        template="http://example.com/?q={searchTerms}&pw={startPage?}&format=rss"/>
 </OpenSearchDescription>
This then allows an Open Search Client such as the browser to make a Search Request based on the XML provided for a Search Engine Service. This is what is used each time you type a search into the little search bar on the top right in Firefox or IE.

IE8 feeds of a similar XML schema for its Activities - which maps out queries for web services, I'd guess RESTFUL webservices. EG:

<?xml version="1.0" encoding="UTF-8"?>
  <openServiceDescription xmlns=”http://www.microsoft.com/schemas/openservicedescription/1.0”>
  <homepageUrl>http://maps.live.com</homepageUrl>
  <display>
    <name>Map with Windows Live</name>
    <icon>http://www.live.com/favicon.ico</icon>
  </display>
  <activity category=”map”>
    <activityAction context=”selection”>
      <preview action= ”http://maps.live.com/geotager.aspx">
        <parameter name="b" value="{selection}"/>
        <parameter name="clean" value="true"/>
        <parameter name="w" value="320"/>
        <parameter name="h" value="240"/>
        </preview>
      <execute action="http://maps.live.com/default.aspx">
        <parameter name="where1" value="{selection}" type="text" />
      </execute>
    </activityAction>
  </activity>
</openServiceDescription>
Unfortunately following the namespace for the openServiceDescription XML document yields an equivalent of a 404 page. Wow Microsoft, nice documentation. Guess you'll have to Google it.

You may or may not be aware that this is a standardization of a number of existing data formats and widgets used to display exactly the same thing, links that enable you to add a piece of HTML directly to an external web service.

Generally, a developer develops a web service, they have to syndicate that service some how. They have choices such as JSON, RSS, ATOM, or AJAX widgets etc. The problems with these is that it does not allow an external service to make a dynamic request or query to their service in a standard way. Open Search was developed to standardize this for Search Engines. Now it looks like Microsoft has come up a similar standard for general web service.

The key difference between a standardized format for querying a web service and the web service description provided by the web service itself is simplicity. You can query any web service if you have the technical expertize to read the documentation, and implement a web service request and consume its response. However, you cannot implement the description of one web service directly to another unless you have a standard description for querying both - Open Service Description.

In other words, this is how IE8/Microsoft aims to have web services come to them, instead of having to go out and implement every web service description out there, developers of web services will be sending their Open Service Descriptions to IE8.

As a developer, this is good news. Now you can hitch a ride with IE8, consume any web service descriptions designed for IE8 and implement them into your own mashups, website, webapp or web service.

Google Maps Geocoding API Launched, Finally!

Looks like Google finally releases a (edit: an improved) Geocoding service for the Google Maps API. Try it out here. I wonder how compares to the Yahoo Maps API Geocoding service that has been available for some time.

edit. Google Maps API has had geocoding available since June 11th, 2006 according to their blog article "Geocoding at Last". They've since then added geocoding for the UK, Australia and New Zealand.

It would be interesting to see a street/address based geocoding service from OpenStreetMap.org. From data alone it is obvious that it would have more world coverage then Google Maps or Yahoo Maps Geocoding. At the moment they only offer geocoding based on "geographical object names" with help from Geonames.org. It should be quite trivial to write a street/address geocoding algorithm using the OpenStreetMap.org data. Half the world lives outside the data covered by Google and Yahoo! Geocoding - the exotic half.

Sunday, May 4, 2008

Twitter API and AJAX

Twitter is a very exciting service. I've been playing around with a twitter mashup in my spare time that I will post here.

Friday, May 2, 2008

Open source, distributed, multi-platform, web browser screenshots!

If you're an XHTML and CSS designer you've had the problem where your beautiful design breaks in different browsers. Therefore, you have to recheck your designs in the major browsers. I normally go with IE6+ and Firefox 1.5+.

Due to the huge number of different browsers out there on different Operating Systems, it usually isn't possible to have access to each browser/OS configuration. That is why many designers use as services such as browsercam.com; which is a paid service that generates screenshots of web pages in different browsers running on different operating systems.

Today while looking for alternatives I stumbled upon http://browsershots.org/. This is an Open Source service that takes screenshots of web pages in different browsers and Operating Systems on distributed computers working together via XML-RPC. Contributers to the service register as Screenshot Factories which poll the Server's for screenshot requests in its queue.

The author of project, Johann C. Rocholl, came up with the idea in November 2004. The service has been around since Feb 2005.

Wednesday, April 23, 2008

Proxy through Google, the best HTTP Proxy

A few days ago I mentioned how to create a bookmark that will translate any webpage to English using Google Translator. Probably not so evident, is that the google translator is the best HTTP proxy available on the web. So just as you would translate a page with google, you can use it as your HTTP proxy.

Create a bookmark by right clicking on the bookmarks toolbar in Firefox

  • Choose New Bookmark
  • For the Name field fill in what you want, like translator or proxy
  • For the Location field fill in:
    javascript:location='http://google.com/translate_c?u='+location
    

Now when ever you want to proxy a website or page through google just click on your bookmark.

If the website is already in English, then for the Location you will want something like:

javascript:location='http://google.com/translate_c?langpair=fr|en&u='+location
Which tells google to translate from French to English as it will not want to translate from English to English.

Thursday, April 17, 2008

Secure Joomla file permissions - Linux with Apache

Joomla allows web based installation of extensions, because of this, on most Joomla setups I've looked at, the method of allowing PHP to install the Joomla extensions is to allow global write access (chmod 777) to the Joomla installation directories. This is not a secure way of managing a Joomla site.

A secure website should not have any folders or files with global write access, especially on shared servers, yet on 90% of Joomla websites I've looked at, this is the case.

An example is when you install community builder, probably the most used Joomla 3rd party extension. If Community Builder tries to write to the /images folder but fails to do so during installation, it will spit out, "You must chmod 777 your images folder", I forget the exact sentence.

So why do you open up global write access? The reason is that your ftp or shell account user is different from the PHP user. When PHP executes, it executes under a certain user, by default the Apache user which can be "apache" or "www-data" or something else depending on the Apache settings. So if a you have a folder that has permissions 0755, and is owned by "joe", apache cannot write to this folder because it has insufficient permissions.

Ways of enabling PHP to write to Joomla installation folders

  1. Change folder permission to 0777
  2. 0755 permissions, change owner to www-data and group to users
  3. 0755 permissions, change file group to apache group

In which cases would you use each permission setting?

Change folder permission to 0777

chmod 0777 path/to/folder
If you are on a shared server, then your only choice is (1) to chmod the folders to 0777. Only the root user can chown folders and files. Since most hosting accounts are on shared servers, the majority of Joomla sites (and other CMSs) will have installation folders with 0777 perms.

0755 permissions, change owner to www-data and group to users

chown www-data:users path/to/folder
This is probably the most recommended setting. This allows Apache to read and write from the folder since it is the owner of the folder, yet also allows users in the group "users" to write to the folder. Thefore, if your FTP users are under the group "users" they will be able to update files, while the Joomla installer will be able to install and update components.

0755 permissions, change file group to apache group

chown joe:www-data path/to/folder
This isn't the normally recommended way, but it is what I normally do. This permission setting allows only the user "joe" to write to the folder and not every other user. It also allows apache to write to the folder. So only joe can ftp into this folder and write as opposed to method (1) where any user in the group "user" can write to the folder via ftp. (this doesn't prevent anyone from using apache to write to that folder however).

How to install Joomla extensions on a shared server without giving global write access

  1. Install Extensions Manually via FTP and MySQL Queries
  2. Chmod 0777 only for the installation period, then chmod back to 0755

Install Extensions Manually via FTP and MySQL Queries

This allows you to install the extension, but if the extension wants to write to a folder later, you still have the permission problem since the folder is owned by your FTP user. However, it is good to know how to do this, since it can be a method if combined with other methods. If you have shell access this is easier. See my post on remotely installing Joomla, and use this for extensions. For the mysql portion, you need to retrieve the mysql queries from extensions XML install file and run those queries against your Joomla database. Then you also have to manually add the entry in the extension table, whether the components, modules or mambot table for that extension.

Chmod 0777 only for the installation period, then chmod back to 0755

I've written a PHP Shell script for this that you can run in the command line if you have Shell access to your server.

#!/usr/bin/php
<?php

// joomla extension folders, add more folders here if you need.
$folders = array(
 'media',
 'components',
 'modules',
 'templates',
 'mambots',
 'administrator/templates', 
 'administrator/components',
 'administrator/modules',
 'images',
 'images/stories'
);

// get Joomla directory
fputs(STDOUT, "Please enter the path to the Joomla directory: ");
$jpath = trim(fgets(STDIN));
// check for ending slash
if ($jpath[strlen($jpath)-1] != '/') {
 $jpath .= '/';
}
// make sure path exists
if (!is_dir($jpath)) {
 fputs(STDOUT, "$jpath is not a valid joomla directory");
 return 1;
} else {
 // check for each folder
 foreach($folders as $folder) {
  if (!is_dir($jpath.$folder)) {
   fputs(STDOUT, "Error: A required Joomla folder $jpath$folder was not found. \n");
   return 1;
  }
 }
}

fputs(STDOUT, "Joomla directory set to: $jpath \n");

// allow global write access on joomla extensions folders
foreach($folders as $folder) {
 fputs(STDOUT, "Unsecuring: $jpath$folder \n");
 if (!chmod($jpath.$folder, 0777)) {
  fputs(STDOUT, "Error: Could not change permissions on $jpath$folder. Please chmod 0777 $jpath$folder manually. \n");
 }
}

fputs(STDOUT, "Joomla directories are ready for writing. You can install your extension \n");
fputs(STDOUT, "Press any key when you complete your installation to secure Joomla again... \n");
$enter = trim(fgets(STDIN));

// remove global write access on joomla extensions folders
foreach($folders as $folder) {
 fputs(STDOUT, "Securing: $jpath$folder \n");
 if (!chmod($jpath.$folder, 0755)) {
  fputs(STDOUT, "Error: Could not change permissions on $jpath$folder. Please chmod 0755 $jpath$folder manually to secure.\n");
 }
}
fputs(STDOUT, "Joomla install directories secured. \n");

return 0;

?>
To run it, save it to a location on your joomla server, name it something like joomla_exts.php and invoke it in the shell with:
./joomla_exts.php
The script will prompt you for the Joomla folder, then it will chmod each installation directory to 0777, and tell you to make the component install. So you just install the component in the Joomla web based installer. After installation, just hit enter in the shell script to secure the Joomla installation directory again. This works better then that above method, since all folders will be 0755 after installing the component, but the folders created by the component will be owned by the apache user, allowing the component to write to them. Make sure you don't leave this script in the web root. Keep it under the web root, or delete it after use.

If you're totally lost, here is a bit on file permissions in Linux. Here is a very good article on setting up Apache including file permissions and virtual hosts.